Bill originally built the shaker deck to help harvest potatoes. For years we have grown potatoes in bags, not in ground, not in raised beds. It just works better for us. We will probably never get the huge harvests that other methods provide but we are happy. Frankly happy is a pretty good outcome for anything that you do in life. The shaker deck made bag harvest simple and quick. We could work through 50 bags in a short amount of time and not miss a single spud. This year we put the shaker deck to work breaking up bags of dirt and adding amendments to reclaim the dirt.
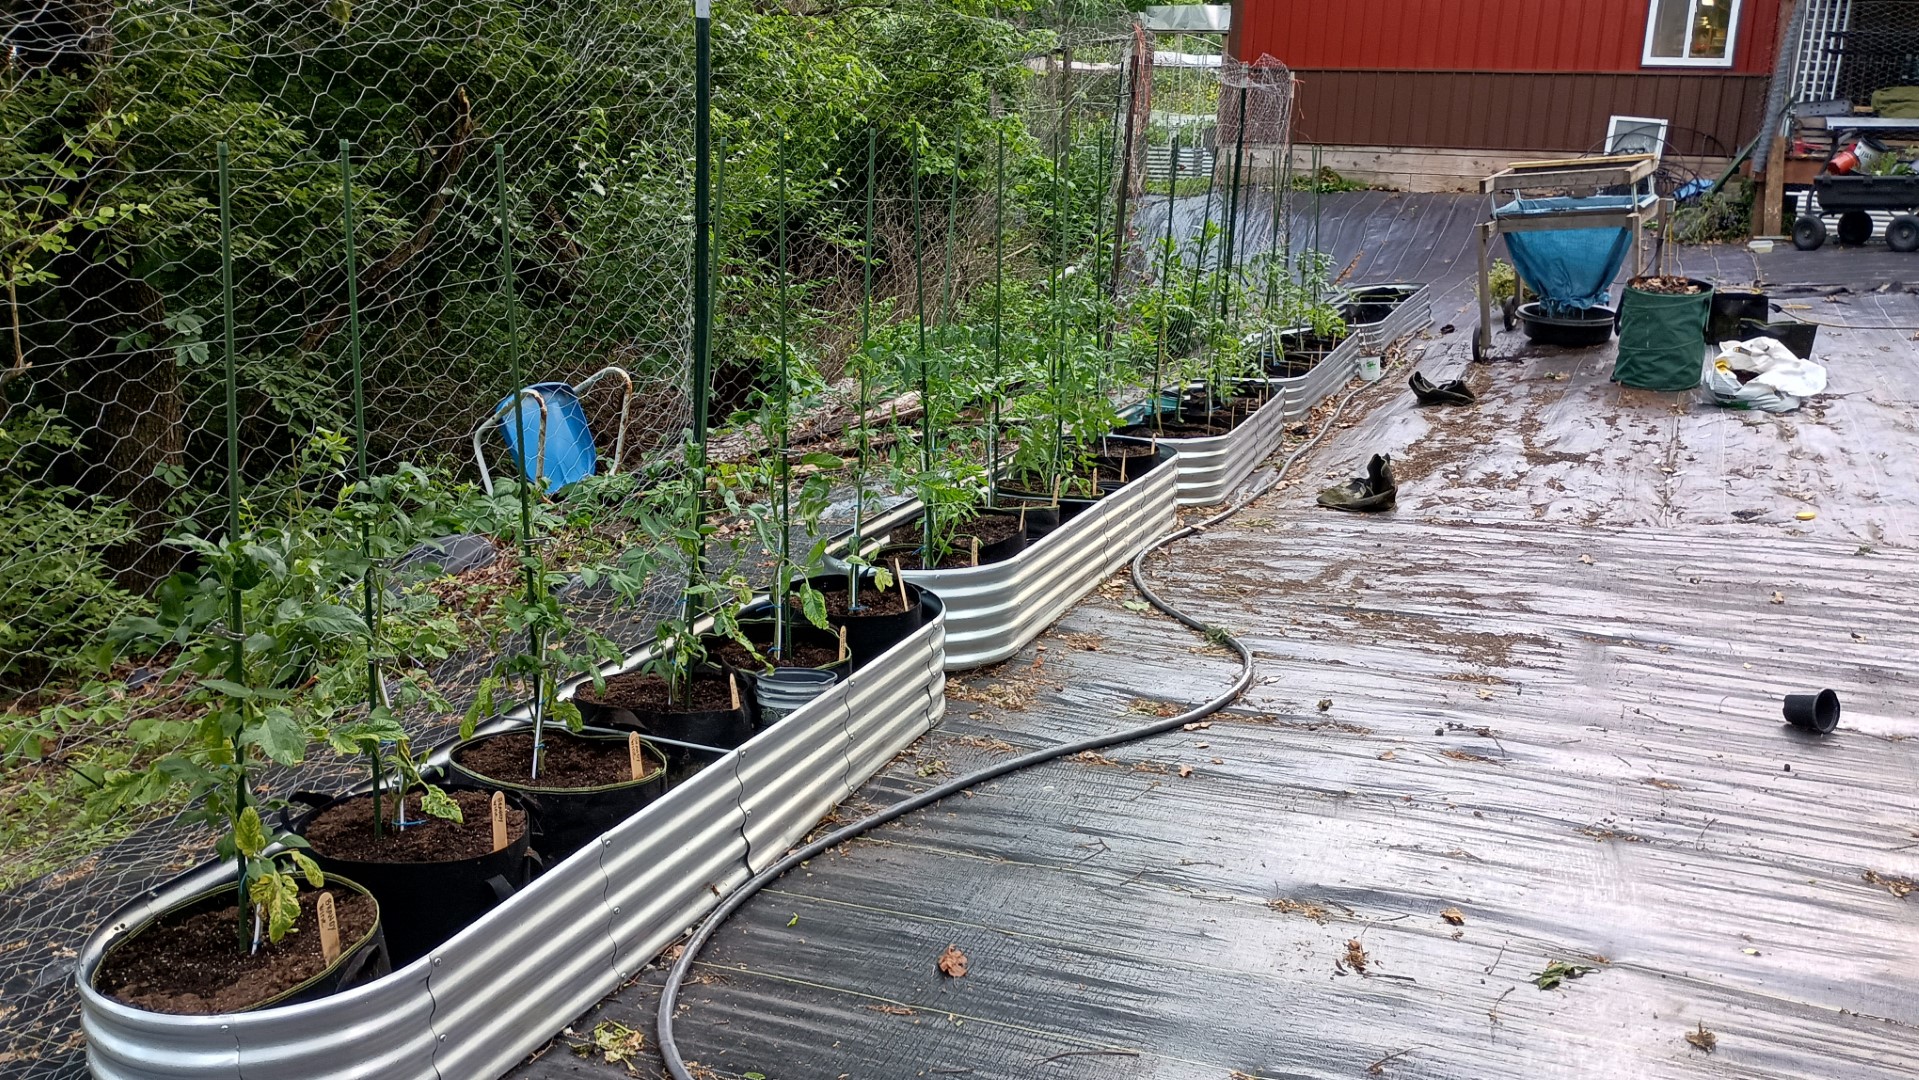
Because we are carving out a new space and how we wanted it to work and what we wanted to do in, it has been evolving. We decided not to fill the raised beds. The plan this year was to put the tomatoes in those raised beds till we could get all the berries moved to them. That’s still the plan, the change to it is we are putting bags in the beds rather than just putting the soil straight into them. The reason is bed placement keeps changing. Since we are not 100% sure that the beds will stay where they are now sitting we don’t want to put the dirt in and risk having to shovel it out in order to move the bed. You say lazy, I say working smarter. We tend to over crowd our tomato beds. A happy side effect of using bags is, it’s one per customer, not overcrowded. Since there will be spaces between the bags I’m going to plant the marigolds in pots and set them in the spaces rather than planting them directly in with the tomatoes. Less nutrient competition plus less crowding but we still get pollinator attracting flowers. You might point out that the benefits of planting them together are gone, and you would be right. The issue with root knot nematodes is you have to actually plant the tomato in the same hole that the marigold was in that never happens for us. This year we are thinking of buying Triple Threat Nematodes and adding them to the beds especially where we know we have issues that they will address.

We do have issues with several of these pests and if it will work against squash vine borer larvae before they kill the plant, holy moly I’m in! It also maybe a way to combat fungus gnats with seed starting in the house. If only they also worked on white fly and spider mites. Sigh.
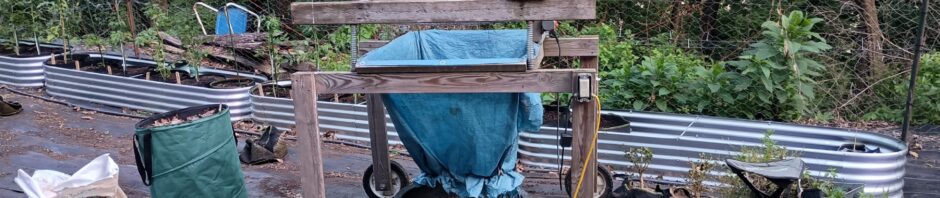
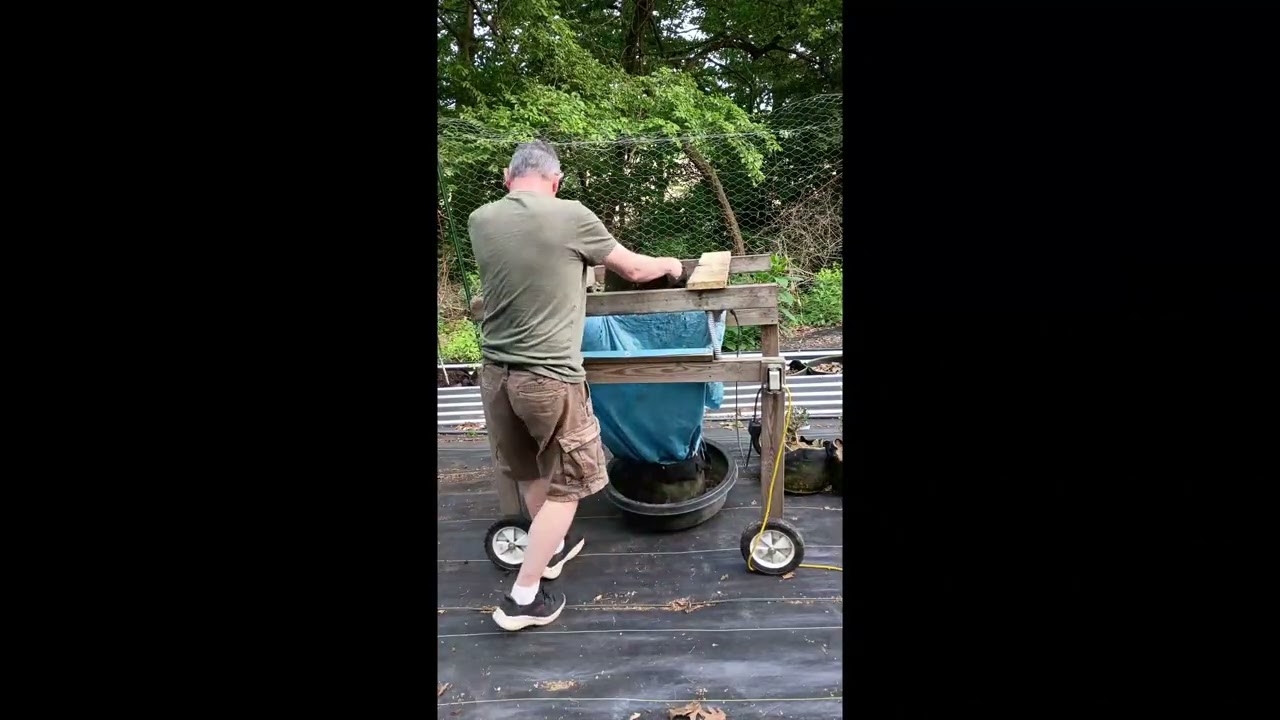
Back to the shaker deck. After making the decision to use bags we knew we would have to recharge that soil. Most of it was fresh from last year and I did use a healthy amount of compost because we were growing squash and melons in them but the soil still lost nutrients. The old method of recharging the dirt would be to either put it in a wheel barrel or on a tarp and by hand break up the old dirt and removing unwanted items, then add in amendments and mix it all up before shoveling it back into the bags. At my age all that dumping, mixing, breaking, sorting and shoveling does not sound fun. Bill said, “Let’s use the shaker! We can dump the bags in, let it break it all up, scoop the bad bits off the top, and then shovel it out of the cart into the bags!” I said, “Shovel? That does not sound fun. How about we put an empty bag under the shaker deck and just sift everything together into the new bag we want to plant in!” I am wise beyond my years.
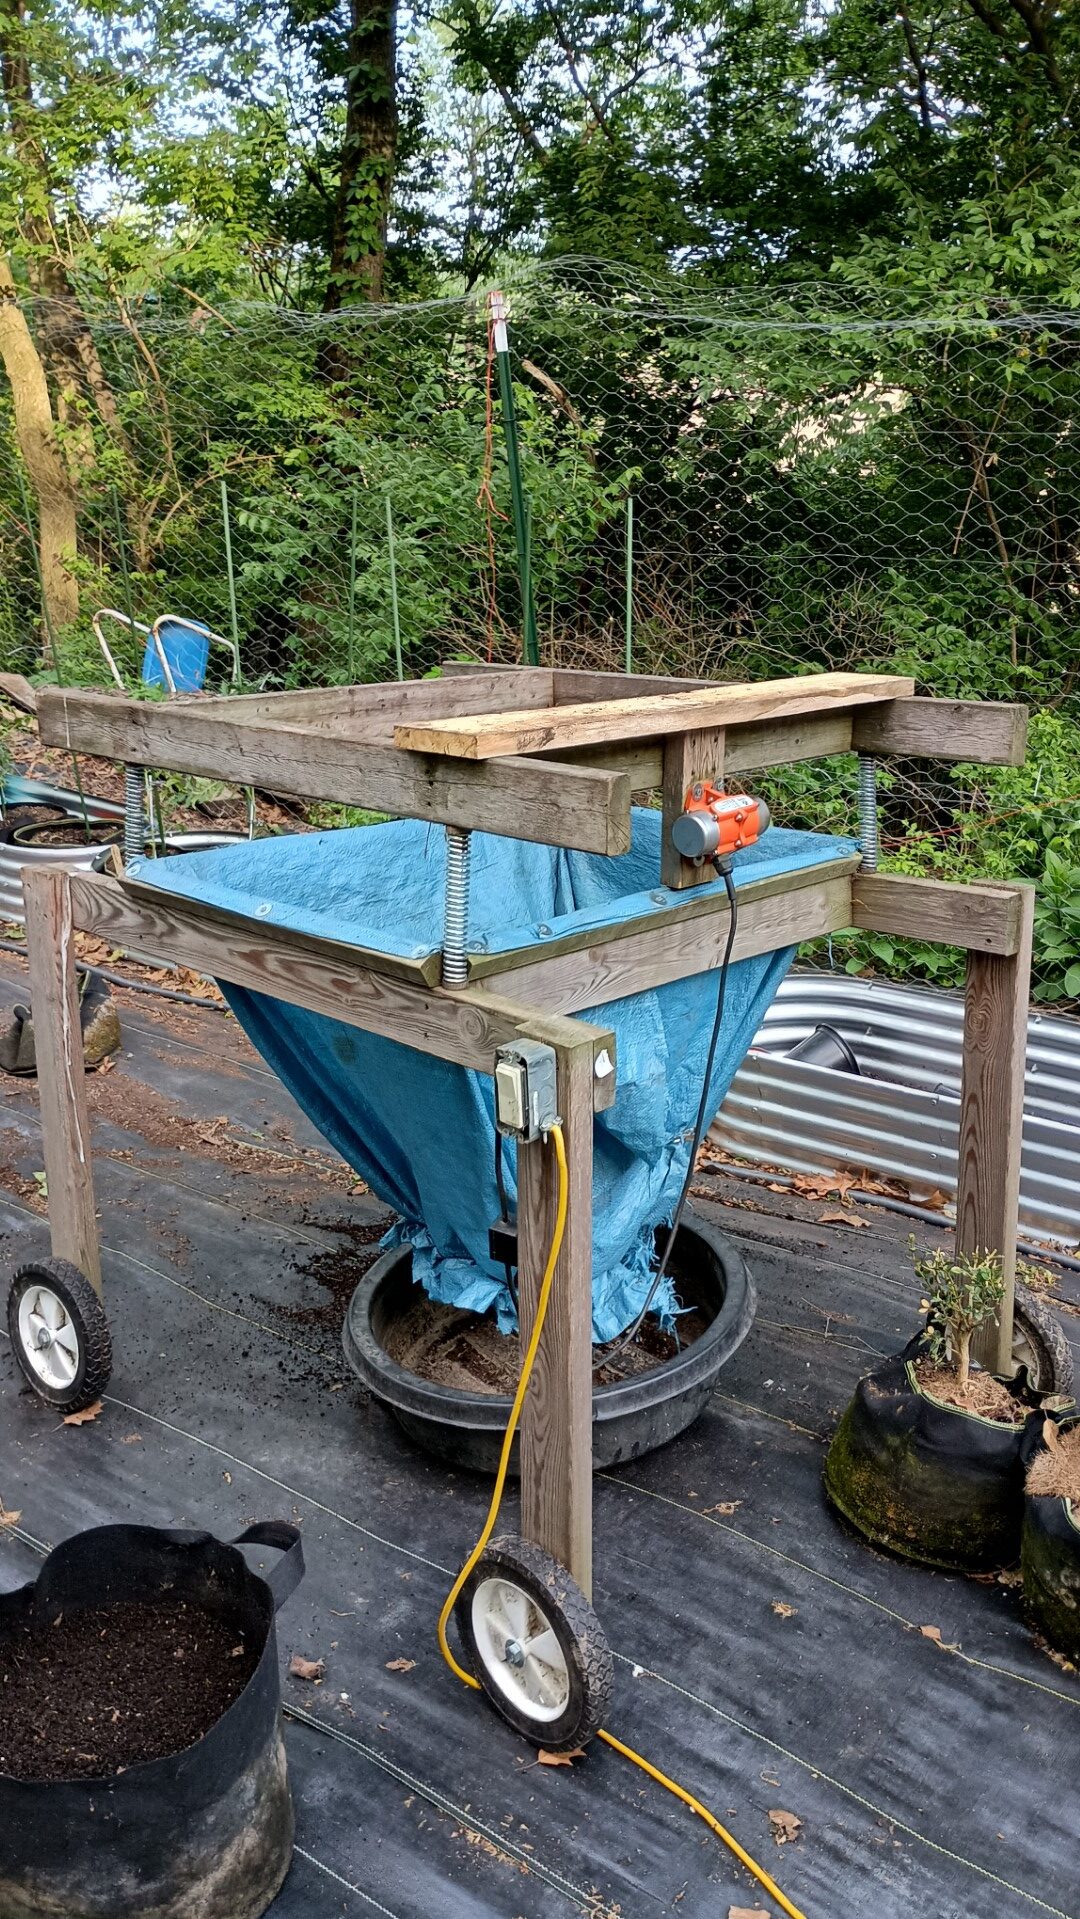
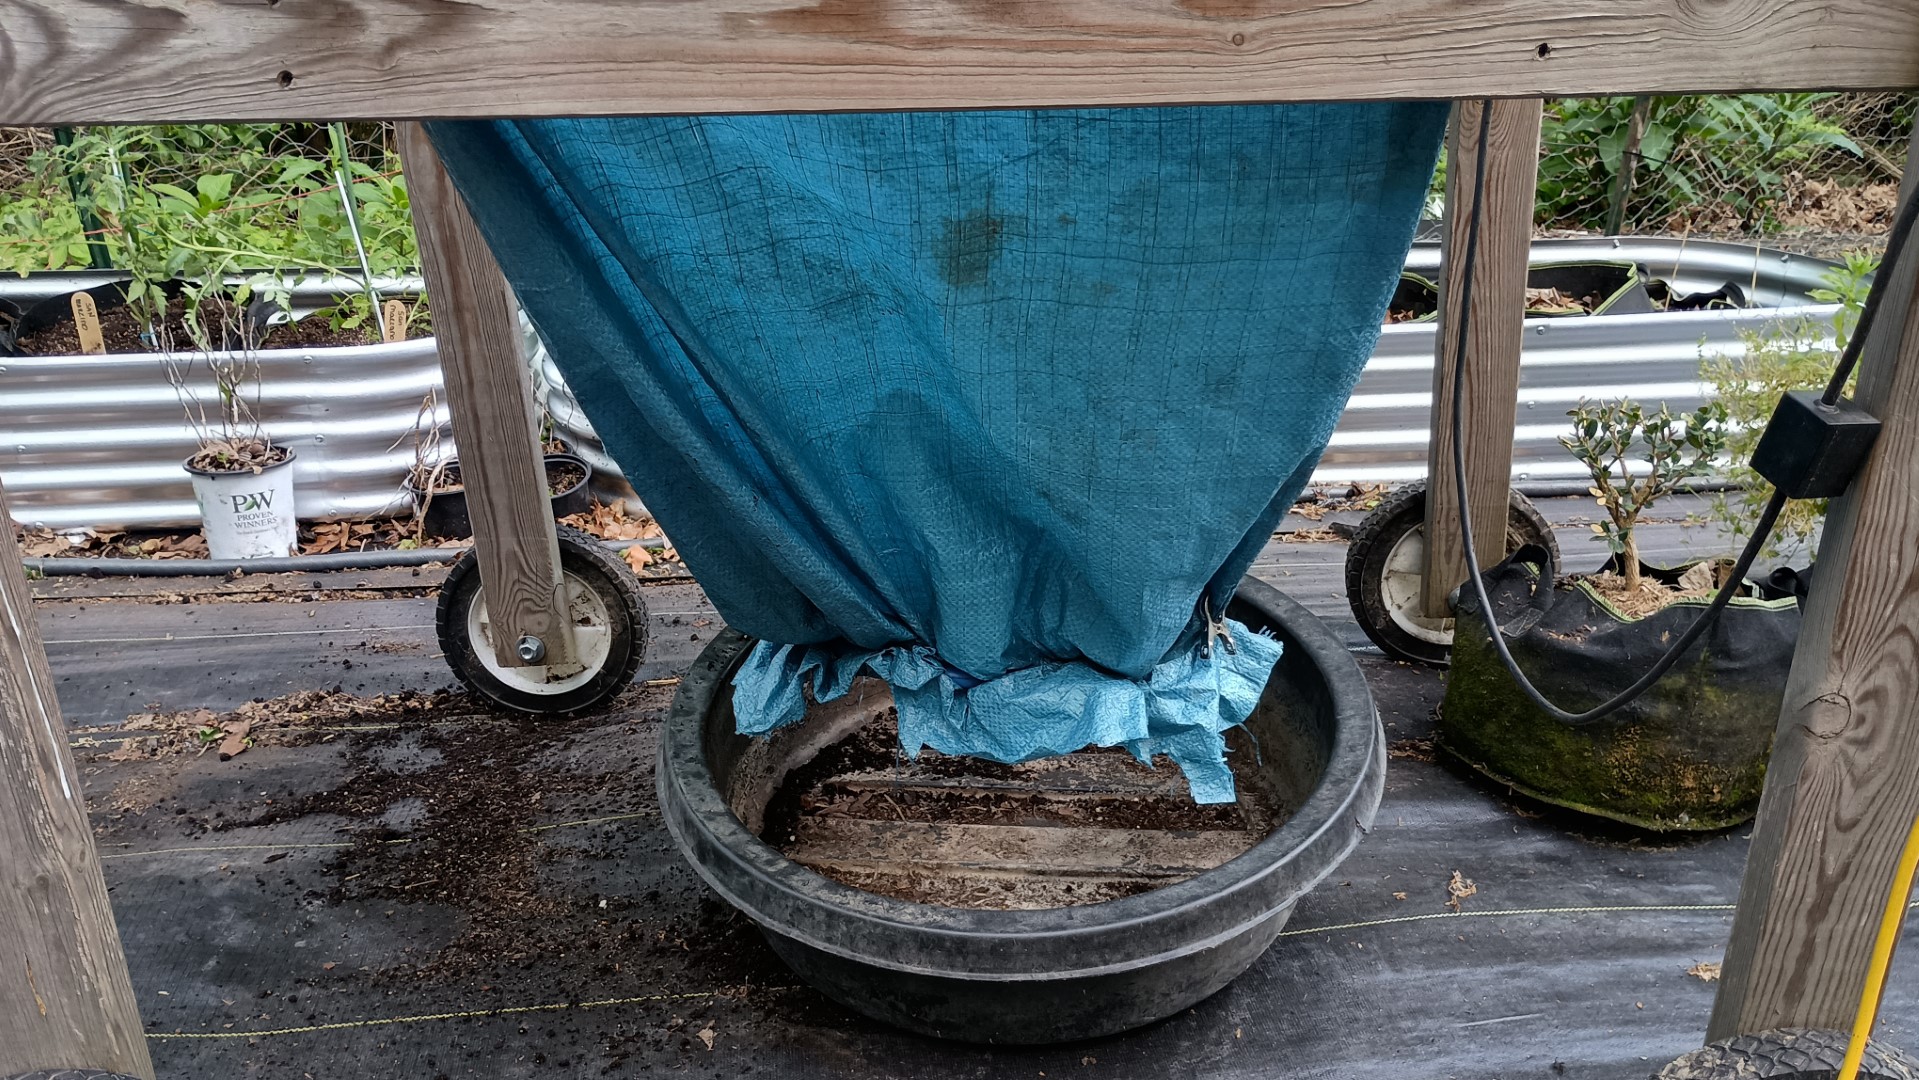
The problem was the shaker deck is much bigger than any bag we want to use. The solution? A funnel that goes into the bag. Time to create a prototype. Bill found an old tarp that was now less of a tarp and more of a suggestion of a tarp. He located a section that was still mostly intact and cut it to fit around the top of the shaker deck. He then attached that with screws and washers. The next issue was that the bottom of this funnel was way wider than the bag, it needed to narrow to fit inside the bag. Be rigid enough to help hold the bag open but flexible enough to easily lift in and out of the bag. We have pex plumbing that worked to add rigidity to the bottom. He cut a piece to fit inside the grow bags and then wrapped the tarp around that. Wrapping so that the inside would be smoother and the outside is where the ends would be secured. After the first test we realized that there is dirt spillage. We needed something that we could set the bag in to catch what got spilled so that we could dump that back into the bags. We have an old animal water/pond type dish. It is wide enough that any dirt spilled on any side is caught. Rigid enough to allow the entire pan to be pulled out when the bag is filled. Light enough and small enough that it’s easy to lift and dump.
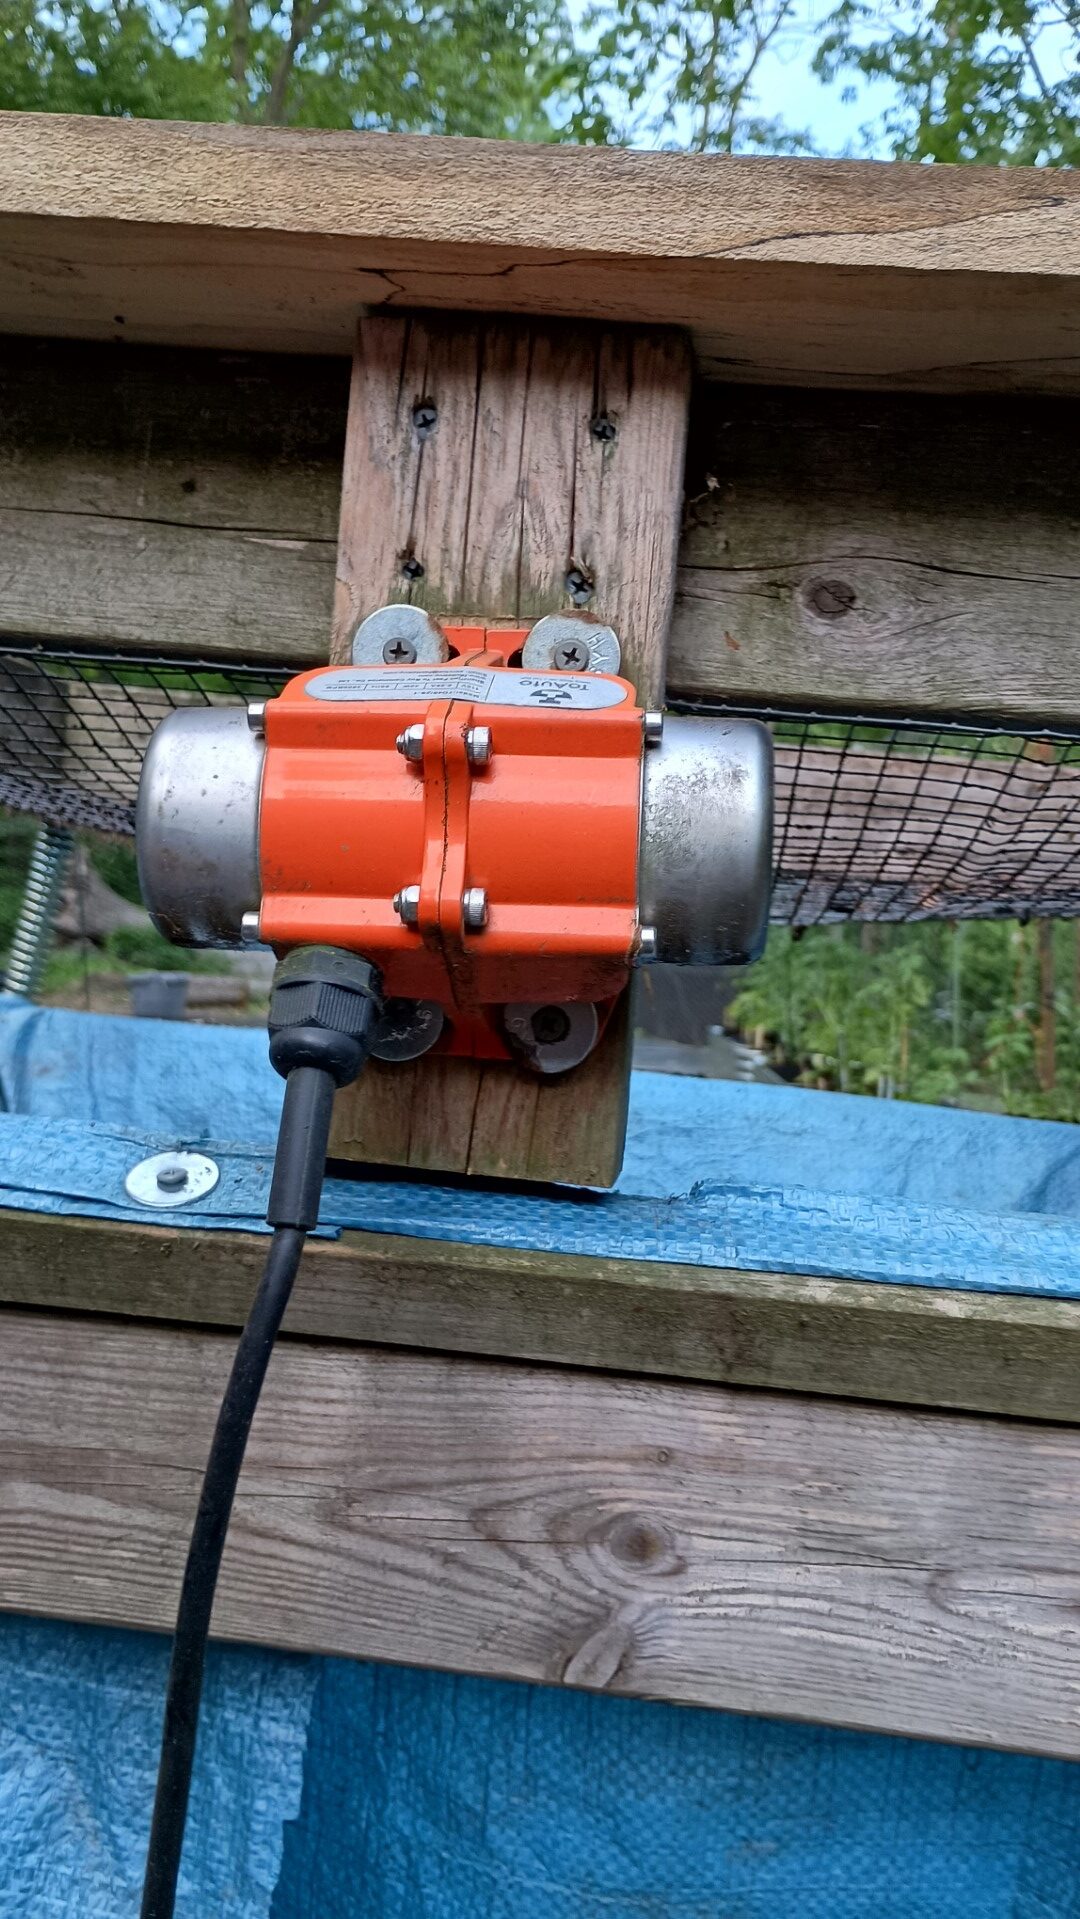
Time to get sifting. As each bag is dumped on the top of the hopper we can add the fertilizer, perlite, compost, new potting soil, or peat. It all gets mixed together by the shaker. We dumped the first bag and turned the motor on (forgetting to add in any amendments), here we go! Wait why aren’t we going? The motor is running and it’s vibrating but no shaking. Turns out that after several years of sitting outside in the weather the wood was in need of replacement. The screws were loosened to the point they didn’t bite, and the board the shaker motor is attached to was shaking, but the rest of the screen deck was not. Rather than taking the whole thing apart and replacing the wood supports we added a board on top and secured that. and added a couple of 6 inch screws to attach the frame boards back together. It was quick and it worked plus we now had a “shelf” to set the bags on for dumping which was a very nice improvement.

If we had wondered does this actually make the job better, easier, faster, that first bag answered the questions. Yes, yes it does. We did that first bag by hand and it still made the job much better than trying to break things up and sort them on a tarp or in a wheelbarrow but it took longer and you got a little bit of a work out. With the boards now reinforced and the motor doing the shaking the next bags went much quicker.
The funnel idea is good but the execution isn’t the best. We need to make the sides more rigid. The material is very soft and you can’t wrap it tight enough to stop dirt from piling up in pockets all along the base. When you fill a bag before you remove it you have to go all along the base and push the dirt out of these pockets into the bag. Am I whining? I feel like I’m whining because all of this is still so much faster and easier than shoveling. Plus Bill was doing most of that so it was super easy for me. It was taking him a long time though and I get bored easy and I wander.
The other negative was that the shaker is too wide to get through the door to the garden. All the bags had to be brought from the garden to the shaker, filled and then transported back into the garden and put in place. That makes things take a little longer and just a little more work. We can do better, let’s be better people, so we took a break.
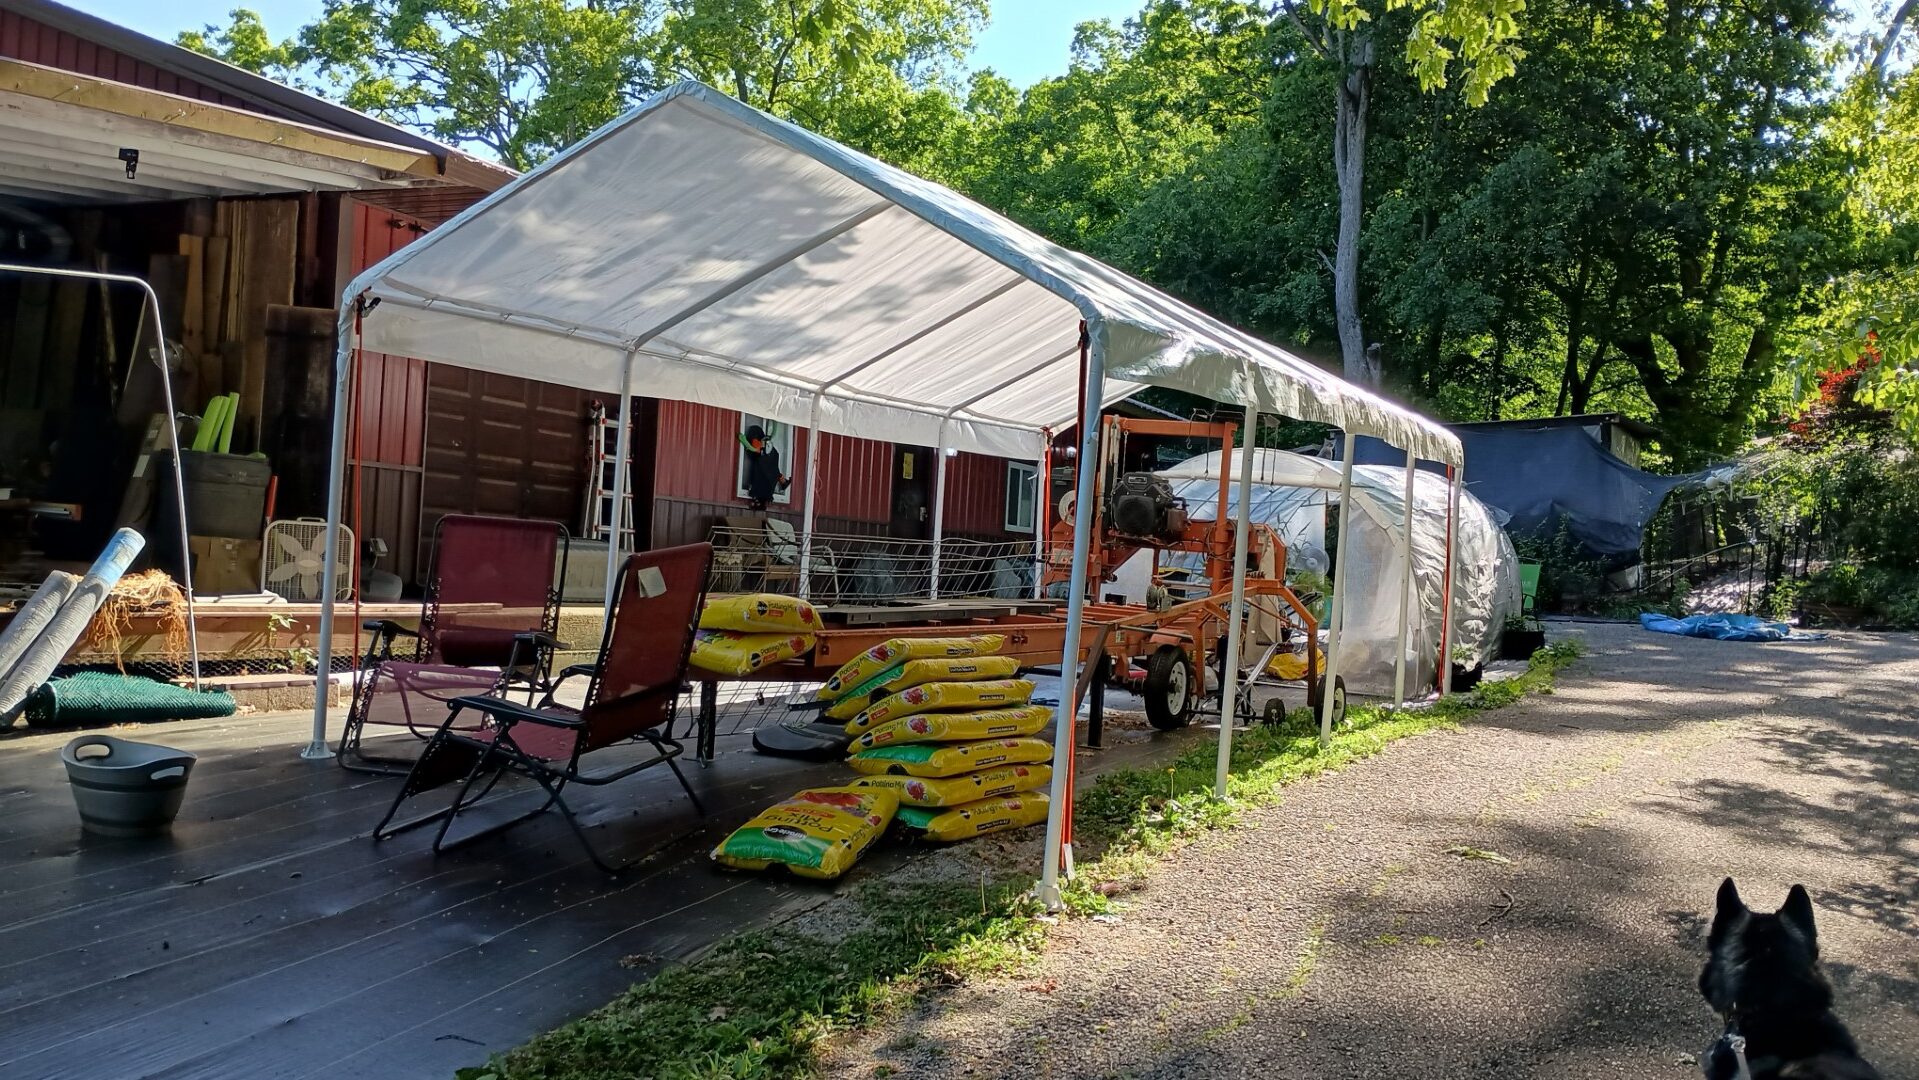
When we were getting ready to go back out I suggested that we move the pop up tent over to where we were working so that we had some shade. When we got out there I came up with the brilliant idea of let’s not move the pop up tent let’s build the new Wood-Mizer canopy! It will be easy and quick and we kill two birds with one stone we get shade and we get that canopy up. Bill agreed. Once the box was opened we started to question our decision but the box is open so we forged on. The directions clearly said you need three people. We are two. The directions also do not EVER mention that you should build the structure to the side of where you want it and the LIFT it up and over a sawmill. Yet this is exactly how we built it. Having just lifted and moved two similar structures we figured pfftt amateurs this will be a walk in the park. Once the roof was assembled on the ground and we were standing there looking at this huge structure with poles that are not actually attached but rather shoved together we did wonder if perhaps, maybe, I don’t know, the directions didn’t mention “lifting”, because you can’t. But it was now assembled so we forged on. In case you were wondering we did get that entire roof, all 26′ x 12′ of it lifted up and over the sawmill and we finished the assembly and got it secured down. That also finished off our work day, no more bag filling.
The delay in bag filling turned into a good thing because I thought of a way that we could get the shaker into the garden. All we had to do was lay it down and then put one side in as far as it would go and that should allow the whole thing to clear the door frame. Once it’s in the garden we just stand it back up! I told Bill my idea prior to just going out and trying it just to make sure that I was not going to damage it. Bill went out and did it. Turns out the entire top of the shaker comes off, which I did not know and that would have been spicy when I was trying to lay it down. Which brings us to yesterday.
I wanted to plant beets. I also wanted to add two more bags of potting mix to that raised bed before planting beets. I did not want to carry them. I wanted to use the cart, which currently had four grow bags waiting to be sifted sitting on it. The gorilla cart has a large number of plastic pots filled with used dirt in it. Time to shake it, don’t break it baby. Actually I did break it, oops.
I thought I’ll just get these four grow bags done and then I can go plant beets. Nine bags later I thought I might have broken the shaker. It was no longer shaking the deck but the motor was running and vibrating like crazy. I turned it off and pretended like nothing had happened. Later I asked Bill to take a look at it because something seemed wrong. He reported back that the screws were loose. Which I had suspected, but both of them seemed to be okay when I looked at them I mean maybe the one was a little loose but not bad. Turns out there are four screws holding the motor to that board. One of the two on the bottom was half way out and the other was laying on the ground. Yea that could be a problem.
Another idea I had on how to make this even more efficient was, the beds are narrow and low and the shaker is wide we could pull the beds away from the fence and then roll the shaker along them filling bags or beds as we go. If we did that we would not have to lift bags twice just once to dump on the bed of the shaker and that’s it. Any dirt that missed the bag would need to be scooped up somehow or just left. Yesterday as I was filling beds with bags I kept rolling the shaker to the next section. It was incredibly efficient not as efficient as filling them in the bed but still pretty darn good. The shaker was catching all of the rocks, leaves, sticks and some kind of mystery bug shell things that I really don’t want to think to much about. There was also a large larvae which I think might have been a Japanese beetle. I was so excited about the progress being made that I forgot to add any amendments to the soil, sigh. Today when I get started planting tomatoes I will have to do that and mix it in by hand but the soil is so fluffy and light it will be easy. That’s the thing about using that shaker to break up soil. Some of those bags seemed solid and compressed, some of them were filled with roots which were making a solid mass. Anything planted in them would have had a struggle to grow roots but now that soil is fluffy and loose.
Here it is in action:
There are definitely some repairs or updates needed.
- Adding a better funnel to stop dirt from being able to pool up around the base ring.
- Either use bolts to secure the motor rather than screws or better yet make a mount from metal.
- Replace the boards that are no longer solid. Keep that shelf idea though.
- Think of a way to keep the bags from folding in on themselves make them a little more rigid for filling. Maybe some kind of thin plastic that you could slide in for filling but still slip out easily once the bag is full.
I once had a boss tell me that I work hard not smart, Don would be so proud to know that after decades I am now taking his advice and starting to work smarter.