
Long story short don’t give up. Wherever you are at it’s progress from where you started even if it’s 12 steps back. The delay actually turned out pretty cool because had I done this 7 years ago he would have outgrown it. Now he should be able to wear this for as many years as he wants to. This started 7 years ago with a promise to my youngest son that I would make him Havel’s armor from Dark Soul’s. Fast forward to today, still no armor.
I started with the helmet. Using cereal boxes I cut out all the pieces and taped them together. Then resized and cut them out again, and again and finally I had something that was close to a helmet. That was then covered in fiberglass because foam is squishy and Havel’s armor is rock. It is heavy. It is hard. I needs a lot of sanding to get rid of the sharp bits. It also needs a lot of cutting and then more sanding. It is also larger, very large, and roundish. So it sits on a shelf in the office and has been there for at least 3 years maybe 4 possibly 5.
Meanwhile I had also started the great shield and the dragons tooth weapon. First time out of the gate the tooth broke down by the tip. Repairs have been made and then more repairs and then it sat for 2 years while I thought about what to do next. Then I started the repairs again, that took month(s) to dry, so that shaping could be started. Between start and finish I realized I don’t like the look of it, it can be better. More spray foam, more drying, more carving and here we are. It now sits behind me wrapped in tinfoil and PVC glue ready for fiberglass to be applied. The goal is to use my foam as a form and create a hollow fiberglass shell which should be lighter and sturdier than the foam one.
Back to the helmet. I found a full Havel pattern and was so happy. First thing I did was cut out that helmet and do it up in foam. Ummm is this for a baby Havel? It was put aside again for about a year while I thought about my life and about how dangerous promises are. First thing was I needed to learn more about Pepekura which included how to change the sizes of the parts before printing. Second thing was I need to slow down as crazy as that sounds because 7 years sounds pretty slow. I need to take the time to cut things out of a heavier paper so that when taped together they hold a shape so that they can be tried on. I also need to print the numbers, transfer them to the pieces and unto the foam. Eyeballing it does not work and just doing the extra steps up front makes things so much less frustrating because they do tend to work.
After sizing up the helmet pattern by 50% on all the pieces it was better sized. However, the face plate was still to small and had to be made twice more before it was sized right. The helmet itself was to big and to roundish okay it was lumpy and okay I think that was my fault because I tried to join pieces to “make things easier”. After the helmet was all put together I ended up have to cut huge chunks out of areas to size and shape it correctly. The plume was the least trouble except that it seems crooked and a little lumpy where it attaches to the helmet but it’s go time here people so I’m going with it.
Here are things that I have learned in the past month:
- How to change sizes in Pepekura for the entire piece.
- How to change the size of just a single piece using 2D view.
- How to measure in 2D & 3D and also the importance of measure the person the costume is for.
- Add the numbers to the pieces (these could be bigger and darker) then use those to line things up.
- Transfer the printed paper pieces to something heavier, card stock, poster board, cereal boxes. At the same time transfer the registration lines. Before cutting make sure that those lines will be in the pattern piece. Take the edge and find the piece it lines up with and make sure you draw a line to help you register the two edge to when assembling. Do the same when you trace them to the foam.
- I wrote a number on each piece and then on each edge I wrote the number of the piece that attaches to it. If an edge needed to be beveled I wrote that on the pattern so that when I was cutting I did the cut right.
- I kept the pattern piece I had used to test fit near me so that I could look at it if I had a question about how to shape the foam or how a piece was supposed to be positioned.
- Even though I use Barge I also use black, dual temp, flexible glue sticks compressed air as well as superglue and activator. The Barge gets it together and you don’t have to wait for it to dry. How glue can help to fill in gaps or create designs/details. Superglue is great if you are working with something like magnets. Compressed air can set hot glue quickly and activator makes superglue instantaneous.
- I still use paintable, flexible chalk to seal the visible seals and also to help ease detail work. The helmet has details which were to tall to use hot glue to create so I used rolls of insulation foam. It comes in 3 sizes, it’s easy to cut, flexible, and can be found locally. What I did not like about it is that there were big gaps on either side which made the transition to extreme. I tried shrinking it with a heat gun and let me tell you it does shrink as in it will completely disappear if you have the heat to high or leave it for to long. In places where I needed to have the appearance of a carved arch I cut the small size in half and formed my arch then used the sealant to fill around it and make it look sloped. You can get it really smooth if you use water on it or you can wait for it to dry and sand it smooth or leave it textured so it looks more like rock.
- There is a big difference in magnets. The ones from Harbor Freight and Home Depot chip and will actually break into pieces if you are to rough with them. You know like putting them together and taking them apart. But I really like the idea of being able to take the face plate off and easily snap it back on without having Velcro or buckles.
- Helmet harnesses that have the adjustable back dial are the best.
I’m sure the lessons aren’t over because yesterday working with the bracers was the first time I used the whole thicker paper, use the numbers, leave a model to reference, adjust the size of the pattern tricks. It took me longer to get the pattern all setup and cut out than it did to make the actual bracers if you don’t count the detail work but they were done in one go with no swearing. So many of these tricks I have heard repeated and stressed by so many talented people and it’s not that I ignored them because I didn’t believe them. I ignored them because I didn’t have time. I just need this thing done and besides I’m not a professional so I’m not looking for perfection. I wonder how many years ago this could have all been done had I realized it’s not about perfection it’s about doing something with the biggest chance of it working.
Welp its time to go cut out elbow armor so that I can go eat pizza and watch a movie and move one more step closer to having arms done. I’ll leave you with these pictures of how things are progressing.
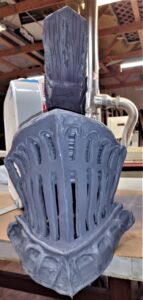

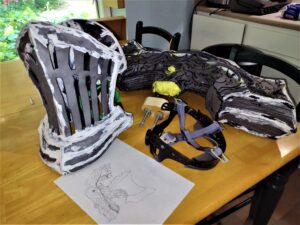
Yes I did draw out what the helmet should look like rather than just working off the computer pic. It helped me to understand how things related to each other plus I was not tethered to the pc. We bought a helmet harness and took things apart sized it to his head and then installed it into the helmet with industrial hook and loop. We ended up using heavy duty double sided sticky tape because the industrial tape was ripping the foam when we tried to adjust it. The sticky tape did not do the trick so we will be trying to hot glue it in. The plume was heavy with the weakest point being at the base where it would attach to the helmet so I filled that with spray foam to beef it up. Then cut a chunk of 2×4 to fit inside that base and added two threaded inserts into the wood so that I could remove the plume for storage or travel if needed. Inside the helmet there are washers on the threaded bolts to help reduce stress on the foam but I might go back and add a 1/4 or 1/8 thickness of board just to further reduce the force they might exert on the foam. The face plate is attached to the helmet with 4 magnets two small ones on the base and two larger ones on the top. The top ones seem to do the job but if you leaned forward the bottom of the plate gapped away from the helmet. The small magnet hold it tight there. After the paint job is done a tinted face mask will be inserted inside the face plate to hide the wearer. I had to fill in the sides of the helmet because the face shield had gaps. If the mask was larger it did not have that tall narrow look we wanted. If the helmet was narrower it did not fit the humans head. Enter the compromise I used craft foam and glued it inside the helmet to cover the gap then used hot glue to create lines running down the foam so that it blended. All of the rolls are rolls of different sized foam coil. Some heated some not. Some glued down using Barge some using hot glue. I attempted to fill in the gaps with hot glue because I did not want to buy anymore rolls of insulation. In the end it was flexible caulk to the rescue, three tubes of the stuff. Prior to painting I was extremely concerned about how all of that was going to turn out.