
When you take the bottle stoppers your husband turned. Take everything out of a storage box in his office and head to the office with a can of spray foam even the best of marriages is put to the test.
I tried putting the bottle stoppers in the leather zip pen case. Did it work? Define work. If by “work” you mean did it zip shut then yes it did work. It also looked like I was trying to smuggle basketballs into the show and only one side of the case could be used or the zipper would not close it.
This display stand hold them securely them 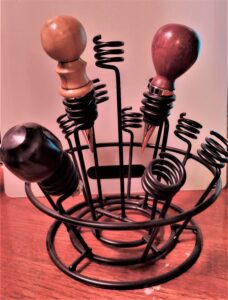 but they can’t travel in this easily or safely. I would like to put them in something to keep them dust free, safe from bumping around, and easy to grab to take to shows. It looks like the only thing to do is make one. Initially I thought of making a form out of cardboard and then using spray foam, until I remembered that a long time ago I bought some fake books. Yes, those would work nicely for some cool storage and even maybe as display at shows.
Let’s talk foam.
I use the typical yellow spray can foam for lots of things both home wise and also in set and prop making. Depending on which type of spray foam you buy you get different expansion results. There is also a difference in hardness and durability. 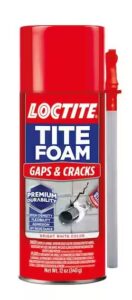 According to a local fiber glass place you can even fiber glass right over the yellow foam without it melting. I have not tried this so test it yourself because I am a chicken. For any project that requires you to be able to carve away foam I’m not a fan of the yellow stuff. You get big air pockets inside. Your carving away and all of a sudden BAM a big air pocket and your sculpture is ruined till you fill that pocket and wait for it to cure. LOCTITE TITE FOAM will work best because I want the insert to be solid around the stopper.
Spraying the surface with water and waiting about 5 minutes or so allows you to mold and shape the foam because it skins over. It continues to expand but you can get a general shape that can be carved and it doesn’t tend to form large air pockets or voids.
I saw someone on Youtube try to use cooking spray as a mold release. I’m assuming the propellent used in that spray must have reacted with the foam because the entire foam mold was a wet uncured soggy mess when unmolded. They do make mold releases for spray form I have never tried these and don’t know what they are I’m just repeating Youtube rumors.
Glues can be tricky too, Super 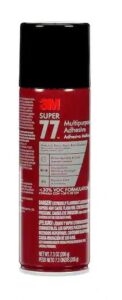 77 is supposed to work with foam. When I was talking to the local fiber glass guy, insert begging him to do the tooth for me and I would pay him, he mentioned that they use this. I use this glue for lots of other things but I have never tested it with foam. Before you try it on your ready to finish piece I would test it on whatever product you are working with to make sure it doesn’t melt it, not actually adhere, or fails under stress. I’ve used PL 300, The Gripper primer, and Hot Wire Foam Factory adhesive and all work well with the insulation sheet foams. PL 300 is hard to cut once it cures and if you don’t smooth it out you will have large thick ropes which can make carving difficult. The Gripper primer is nice because you roll or paint it on and it’s easy to cut through when cured. Contact cement could be an option but I haven’t used it on enough foams to know exactly how it will react. Of course the Foam Factory product works great it was designed for foam but you can only order it over the internet. To many times I have actually been having an adhesive emergency and needed it right that minute. Words I never thought I would type.
Back to the mold, if you don’t have mold release how do you keep the foam from sticking to everything? In this case saran wrap was used and the spray foam didn’t stick to it unless there are wrinkles and the spray foam expands into or around them it will trap that saran wrap and you have to cut it or try and rip it out of the foam.
Attempt #1
 I laid out the stoppers in the box to make sure they would fit and to get an idea of spacing. I actually could have fit 1 or 2 more in here but we only have 3 and I want to test to see if this will even work.
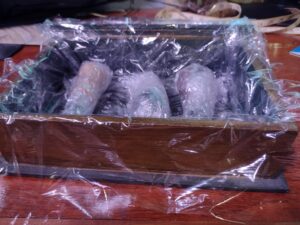 Next I wrapped the stoppers individually in saran wrap and then covered the inside of the box in saran wrap. I did try and get the wrinkles out of the bottom and sides of the box but it was not as smooth as I had wanted it to be. I made sure that the saran wrap overlapped on all sides and that there was enough to cover the lid when it closed. You can see I won’t win any awards for neatness here. I was worried about the stoppers getting spray foam stuck to them so I wrapped them three times which made them bulky and messy. I had hoped that the extra bulk would make the eventual space they would rest in large enough but I don’t think that much bulk did anything positive.
I then sprayed around each stopper, the sides of the box, and the top and bottom misted that with water and gave it a few minutes to setup. I was attempting to create a form and stop the stoppers from moving around in the box once the foam started to expand. I filled the box up with foam covering the stoppers to within 3/4 of an inch from the top. I spritzed it with water and let it sit for 5 minutes or so. Once the surface was no longer tacky I used my hands to push the foam into the corners and down to try and fill in any gaps that might exists. I then pulled the top plastic layer over the foam and closed the lid.
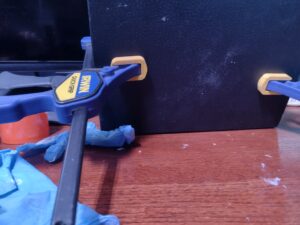
Initially the box lid closed so I put a weight on top of it and let it sit. As the foam continued to expand it caused the lid to raise about a 1/2 inch so I clamped it on both ends. The trick was to use enough foam to cover the entire inside of the box but not so much that it caused the foam to expand way more than needed. For the most part the amount used was perfect. There are two corners that didn’t get completely filled in but that’s okay.
I let the box sit clamped for several hours. When unclamped the top had cured but when I pulled the block of foam out the bottom was still gooey. The top was also beautifully smooth because the saran wrap was smoothed out, it had been spritzed with water so it had skinned over and the top of the box lid is smooth. The bottom was not as nice. I tried to smooth it by pushing it completely back into the box and reclamping it hoping that the pressure and the fact that it had not totally cured would remove the wrinkles, it didn’t.
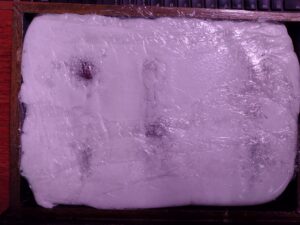
The next morning this is what it looked like on top. You can see the stoppers poking through in places which is okay. You can see that the saran wrap is pretty wrinkled and that the foam expanded into it and around it. Not only did that make my heart stop thinking it might have expanded unto the stoppers themselves but it also made it impossible to remove it. First things first lets get this out of the box.
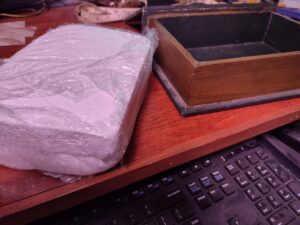 Beautiful! Nothing stuck to the box at all. I had to use a screwdriver to pry the block out of the box but it didn’t damage anything. Now to try and get the stoppers free. This is where I discovered that the foam had not cured in the places where the saran wrap had become imbedded in the foam. From experience I know that I can either wait for weeks for the curing process to finally happen or I can try and cut the plastic away so that the foam is exposed to the air. The reason I know this could take weeks is when I made the tooth for the Havel costume I had to do a repair where the thin end of the tooth meet the larger shaped foam root of the tooth. I use the yellow spray foam and wrapped it in saran wrap to hold it in place while it dried. It was thick, a lot thicker than this, but the repair had to be sturdy. I don’t even remember how long that thing too to finally cure enough that I could start taking the saran wrap off but it took weeks. No scientific tests were done to measure dryness or depth or length of time etc… just me walking by and poking it with my finger to see if it was still gooey.
Since 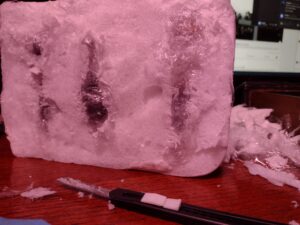 I am not a patient person I decided to try and cut it away. The blade on the knife is ruined, the desk has little spots of foam/saran wrap stuck all over it, and the process involved more tearing than actual cutting. Eventually enough of the foam was exposed to the air to allow it to finish curing. I did a lot of things wrong. I should have put a new blade in to try and cut out the bottle stoppers. I also should have been more delicate and less robust in my efforts to remove material and free them. By the third one I understood things better and was less panicked about having ruined all three of the stoppers by imbedding them in foam. The third one is more of what I had envisioned it is a snug fit and doesn’t just fall out. When you put it in the foam you get a satisfying snap and you have to push.
![]()
Result #1:
![]()
![]()
![]()
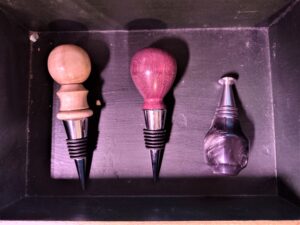
Not what I had been hoping for. They all fit the one on the far left was the last one I took out and I had figured some things out by then so it’s a nice snug fit. The other two are pretty loose. The lid closes but there is a gap so I need to carve them out a little more so that the box lid can close all the way. I would also like to be able to add a piece of cloth or thin foam on top to protect them with this attempt I think that the entire foam insert would need to be shaved down in order to do that. All in all it would work with some more tweaking but I think it can be better, time to change my approach and try again.